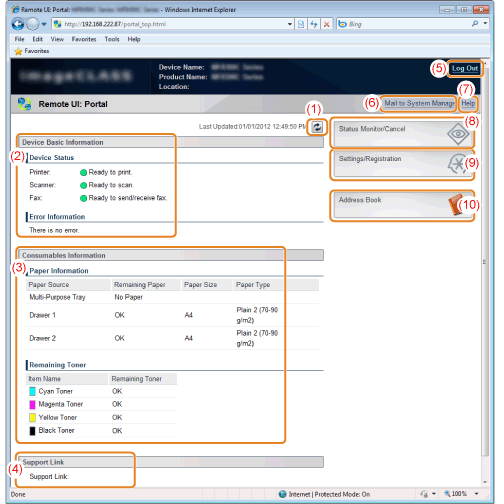
Portal Page
|
(1)
|
Refresh the currently displayed page.
|
|
(2)
|
Display the current status and error information of the machine.
When the error occurs, the link to the error information is displayed. |
|
(3)
|
Display the names of paper feeding parts with the paper information and remaining amount of toner.
|
|
(4)
|
Display the support link specified on [Settings/Registration] page.
|
|
(5)
|
Display the Remote UI top page (log-in screen) when the machine is in log-out status.
|
|
(6)
|
Create an E-mail to the system manager specified in [System Manager Information].
|
|
(7)
|
Display Help for the currently displayed page in a separate window.
|
|
(8)
|
Display the current job status and history, etc.
|
|
(9)
|
Display the settings/registration items of the machine.
|
|
(10)
|
Display the coded dial codes and the Favorites list registered in the address book (MF8380Cdw/MF8080Cw only).
|
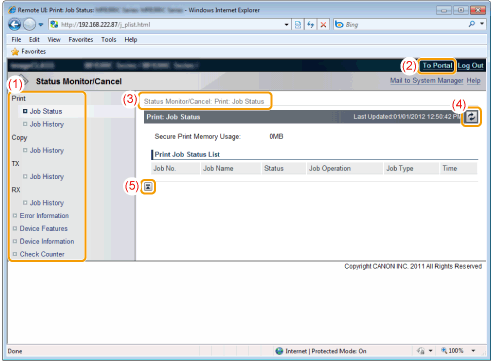
[Status Monitor/Cancel] Page
|
(1)
|
Display the list of device settings.
|
|
(2)
|
Display the portal page of Remote UI.
|
|
(3)
|
Display the hierarchy of the currently displayed page.
|
|
(4)
|
Refresh the currently displayed page.
|
|
(5)
|
Move the scroll box up to the top of the page.
|
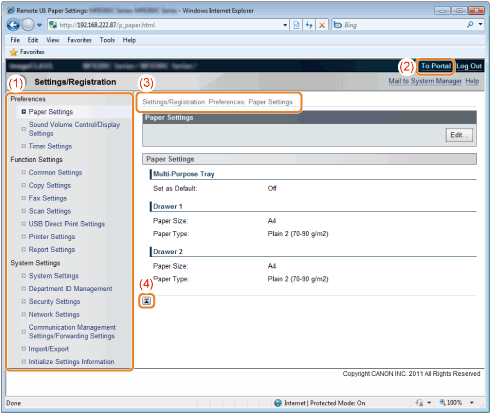
[Settings/Registration] Page
|
(1)
|
Display the list of device settings.
|
|
(2)
|
Display the portal page of Remote UI.
|
|
(3)
|
Display the hierarchy of the currently displayed page. By clicking this, the relevant page is displayed.
|
|
(4)
|
Move the scroll box up to the top of the page.
|
|
NOTE
|
|
About the change of System Management Settings
You can only view [System Settings] if you log on in End-User Mode.
You can change the settings if you log on in Management Mode.
|
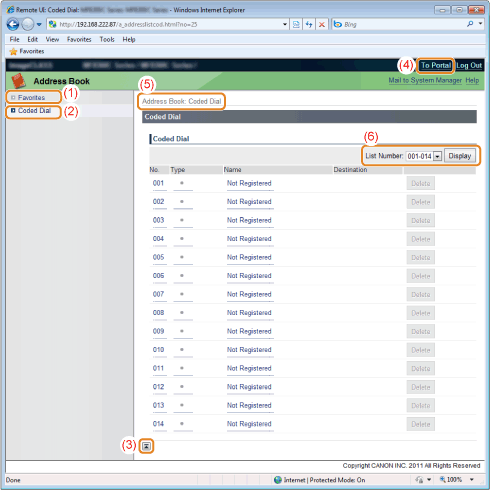
[Address Book] Page (MF8380Cdw/MF8080Cw Only)
|
(1)
|
Display the list of Favorites.
|
|
(2)
|
Display the list of coded dial codes.
|
|
(3)
|
Move the scroll box up to the top of the page.
|
|
(4)
|
Display the portal page of Remote UI.
|
|
(5)
|
Display the hierarchy of the currently displayed page. By clicking this, the relevant page is displayed.
|
|
(6)
|
Display the address of the number selected by [List Number] (for [Coded Dial] page only).
|
|
NOTE
|
|
About the change of Address Book
You can change the address book only if you log on in Management Mode.
|