You can scan a document using the keys on the operation panel.
|
NOTE
|
|
Using the shortcut keys
The shortcut keys allow you to register your computer and send your scans to it with only a few steps. For details, see "Performing a Scan Using a Shortcut Key."
|
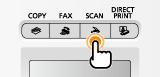
1.
Place your document.
2.
Press [ ].
].
].
3.
Select <Computer> using [ ] or [
 ] and press [OK].
] or [] and press [OK].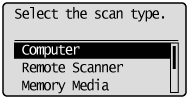
4.
Select the destination using [] or [] and press [OK].
] or [] and press [OK].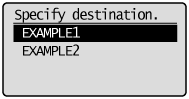
When a computer connected via a USB cable is included in the displayed destinations:
The USB-connected computer is listed at the top.
The USB-connected computer is listed at the top.
When one computer is connected to the machine via a USB cable:
This screen is not displayed.
This screen is not displayed.
When more than 10 computers are connected to the machine simultaneously:
Up to 10 computers can be displayed as a list of computers connected to the machine. (Scanning cannot be performed to the eleventh and subsequent computers. Reduce the number of computers connected to the machine over the network.)
Up to 10 computers can be displayed as a list of computers connected to the machine. (Scanning cannot be performed to the eleventh and subsequent computers. Reduce the number of computers connected to the machine over the network.)
5.
Specify the scan settings using [] or [] and press [OK].
] or [] and press [OK].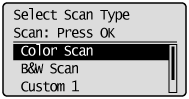
The scanner settings are specified by default as follows.
|
Scan Mode
|
Resolution
|
File Type
|
PDF Settings
|
|
|
Color Scan
|
Color
|
300 dpi
|
PDF
|
Searchable/High
|
|
B&W Scan
|
Black and White
|
300 dpi
|
TIFF
|
 |
|
Custom 1
|
Color
|
300 dpi
|
JPEG/Exif
|
|
|
Custom 2
|
Color
|
300 dpi
|
PDF
|
Searchable/Standard
|
Scanning starts.
 When scanning cannot be performed When scanning cannot be performed |
|
You cannot perform a scan while the MF Toolbox setup screen is displayed.
Click [
 ] to close the screen before starting a scan. ] to close the screen before starting a scan.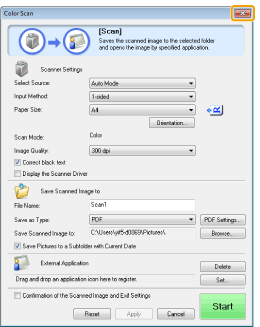 |
|
NOTE
|
|
When scanning is complete
The scans are saved in the appropriate folder.
When additional pages can be scanned on the platen glass
Proceed to step 6..
|
To scan the next page, select <Scan Next Original> using [] or [] and press [OK].
] or [] and press [OK].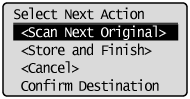
To cancel scanning
|
(1)
|
Select <Cancel> using [
] or [] and press [OK]. |
|
(2)
|
Select <Yes> using [
] or [] and press [OK]. |
To check the destination
Select <Confirm Destination> using [] or [] and press [OK].
] or [] and press [OK].7.
Select <Store and Finish> using [] or [] and press [OK].
] or [] and press [OK].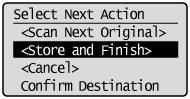
The scans are saved in the appropriate folder.
|
NOTE
|
|
The default save location:
Once scanning is complete, a folder is automatically displayed to which the scanned images are saved. By default, a folder bearing the scanning date is created inside the [Pictures] (or [My Pictures]) folder in [My Documents].
To change the scanner settings:
You can re-specify the save location, file format, resolution, and other settings from a computer.
See "Using the MF Toolbox" for more information.
|