This section describes how to specify e-mail destinations.
See the following sections to specify destinations.
|
For instructions on how to send e-mail, see "Scanning Fundamentals (E-mail)."
|
|
(1)
|
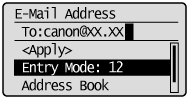
Use the numeric keys to enter the destination e-mail address.
 |
|
(2)
|
Select <Apply> using [
 ] or [ ] or [ ] and press [OK]. ] and press [OK]. |
To clear the entered destination
|
(1)
|
Press [
|
|
|
|
 |
If multiple destinations have been specified, select the destination that you want to clear using [
 ] or [ ] or [ ], and press [ ], and press [ |
|
(2)
|
Select <Yes> using [
] and press [OK]. |
|
|
|
|
To clear all the scan settings specified, press [
 ] (Reset). ] (Reset). |
To select a destination from the address book, you need to register destinations in the address book in advance.
|
(1)
|
Press [
 ] (Address Book). ] (Address Book). |
|
|
(2)
|
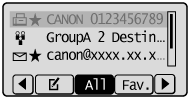
Press [
] or [] to search for your destination. |
|
|
|
Select <
|
|
|
|
Select <Fav.> to display destinations registered in the Favorites list.
|
|
|
|
Select <All> to display all destinations.
|
|
|
|
Select <
|
|
 |
||
|
(3)
|
Select the destination using [
] or [] and press [OK]. |
|
Press [ ] (Coded Dial) and enter the three-digit registration number (001 to 181) with the numeric keys.
] (Coded Dial) and enter the three-digit registration number (001 to 181) with the numeric keys.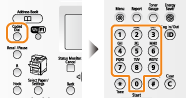
To select a destination from the coded dial codes, you need to register destinations in these codes in advance.
To clear the entered destination
|
(1)
|
Press [
|
|
|
|
If multiple destinations have been specified, select the destination that you want to clear using [
] or [], and press [ |
|
|
(2)
|
Select <Yes> using [
] and press [OK]. |
|
|
|
|
To clear all the scan settings specified, press [
] (Reset). |
When group addresses are registered in the address book
To select a group address from the address book, you need to register group addresses in the address book in advance.
|
(1)
|
Press [
] (Address Book). |
|
(2)
|
Press [
] or [] to search for your destination. |
|
Select < |
|
|
Select <All> to display all destinations. |
|
|
Select < |
|
|
|
|
|
(3)
|
Select the destination using [
] or [] and press [OK].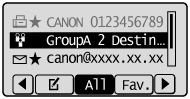 |
When group addresses are registered in coded dial codes
Press [] (Coded Dial) and enter the three-digit registration number (001 to 181) with the numeric keys.
] (Coded Dial) and enter the three-digit registration number (001 to 181) with the numeric keys.To select a group address from the coded dial codes, you need to register group addresses in these codes in advance.
To clear the entered destination
|
(1)
|
Press [
|
|
|
|
If multiple destinations have been specified, select the destination that you want to clear using [
] or [], and press [ |
|
|
(2)
|
Select <Yes> using [
] and press [OK]. |
|
|
|
|
To clear all the scan settings specified, press [
] (Reset). |